How a Rotary Evaporator Works: Principle, Parts and Tips for Safe Evaporation
Vacuum, a warm bath, a rotating flask and a cold condenser work together to remove solvent gently. Here is how each part helps, and how to set them sensibly.
A rotary evaporator (rotavap) is one of the most common instruments in a chemistry or QC laboratory. It removes solvent from a sample without cooking the sample. This article explains the principle, the main parts and a few practical habits that make evaporation faster and safer. It is general guidance; always follow the manual of your own instrument.
The principle: lower pressure, lower boiling point
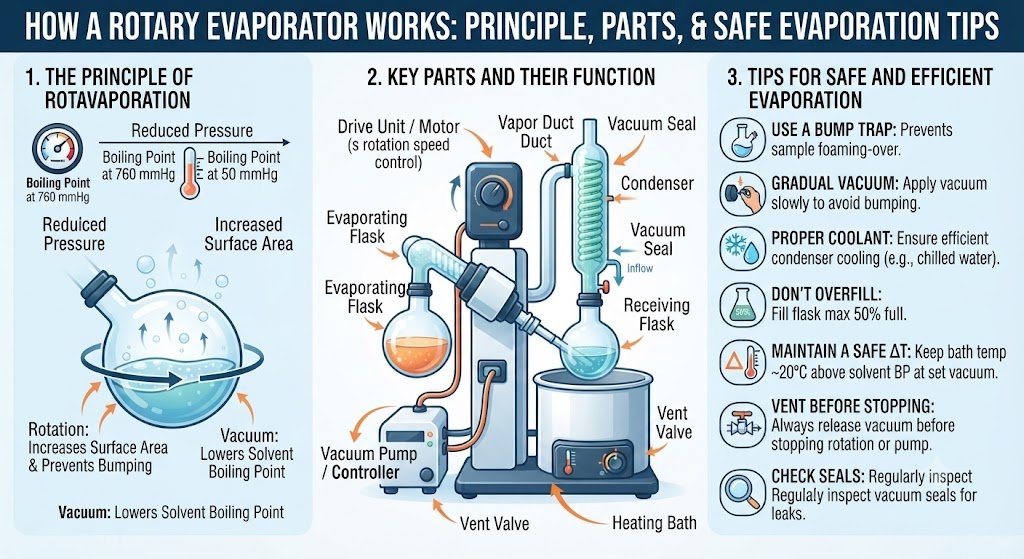
A rotary evaporator is essentially a distillation carried out under reduced pressure. A liquid boils when its vapour pressure equals the pressure around it, so when a pump lowers the pressure inside the apparatus, the solvent boils at a lower temperature than it would in open air [4]. This is why heat-sensitive materials are protected: applying vacuum lowers the boiling temperature, and the lower the process pressure, the lower the temperature needed [1][2].
The four working parts
Most rotary evaporators combine four functions: heating, rotation, vacuum and cooling [3][4].
Heating bath. A water (or oil) bath warms the flask. Modern baths add protections; IKA's HB 10 bath, for example, is described with a dry-run control that stops heating if the liquid level drops, and an adjustable safety temperature [3].
Rotating flask. Turning the flask spreads the liquid into a thin film over a large surface, which speeds evaporation, and the motion also helps prevent bumping under vacuum [4].
Vacuum source. A water aspirator or, more commonly today, a vacuum pump removes air and vapour from the system [4].
Condenser and receiving flask. Solvent vapour meets a cooled surface, turns back to liquid and is collected, leaving the dissolved material behind in the evaporating flask [1].
Choosing bath, vacuum and cooling together
These settings work as a set. VACUUBRAND describes a widely used rule of thumb called the delta-20 rule: set the heating bath about 20 °C above the desired evaporation temperature, and run the cooling at least 20 °C below it. Their example is an evaporation at 40 °C, which suggests a 60 °C bath and cooling at 20 °C or lower [1].
The ideal pressure is the one that matches the vapour pressure of your solvent at the chosen temperature. Lower is not automatically better; too strong a vacuum can cause bumping and foaming [1]. Because mixtures change the real vapour pressure, it helps to check the pressure value against the actual solvent mixture rather than the pure solvent alone [2]. Vacuum can also be adjusted quickly, whereas bath temperature responds slowly, so vacuum is the practical control lever during a run [2].
A useful visual check on the condenser: VACUUBRAND suggests watching the condensate on the cooling coil. A good balance is when about two-thirds of the coil is wet and the upper third stays dry [1].
Rotation speed and flask filling
The source does not give fixed rpm values, because the right speed depends on the liquid. As a guide, use higher speeds for low-viscosity liquids and lower speeds for very viscous solutions, so that material does not build up on the flask wall and heat transfer is maintained [1]. Do not fill the evaporating flask beyond about half of its capacity; overfilling raises the risk of bumping and contaminating the distillate [1].
Automatic vacuum control
Valve-regulated systems tend to overshoot and undershoot the target pressure. Speed-controlled pumps adjust their motor speed to hold the pressure steadily, and some controllers detect the boiling point of the solvent automatically. IKA describes this as giving faster, more efficient and safer distillation with less pump noise and wear [3], and VACUUBRAND makes a similar point about its adaptive pump control [1][2].
Safe start-up and shut-down habits
Test for leaks first: evacuate the empty, dry apparatus, close the vacuum line and watch the pressure. A fast rise points to a leak [1].
Apply vacuum before lowering the flask into the bath. Otherwise vapour spreads through the system before the pump is working, which makes the pump work harder and the process longer [1].
Watch the receiving flask level; overfilling can cause backflow towards the pump [1].
Check the pump's inlet separator and exhaust condenser regularly if your pump has them [1].
Use the lift-out or end-stop features of your instrument to protect the glassware [3].
Quick checklist
Inspect glassware for cracks and check seals before every run.
Run a quick leak test after assembling.
Fill the flask no more than half.
Set bath, vapour and cooling temperatures with the delta-20 rule in mind.
Start the vacuum before the flask touches the bath.
Choose a pressure suited to your solvent mixture, not simply the lowest possible.
Empty the receiving flask before it gets full.
Conclusion
A rotary evaporator is simple in idea: reduce the pressure, warm gently, spread the liquid into a film and condense the vapour. Good results come from setting these four elements in balance rather than pushing any one of them to the limit. Treat the numbers above as starting points and refer to your instrument manual and solvent safety data for final settings.
Sources
- VACUUBRAND - 10 tips for optimal rotary evaporation (read 2026-10-20)
- VACUUBRAND - How vacuum supports rotary evaporation (read 2026-10-20)
- IKA - Rotary Evaporators brochure (RV 8 / RV 10) (read 2026-10-20)
- Chemistry LibreTexts - 5.6: Rotary Evaporation (read 2026-10-20)